GUI Overview
The interface of State Machine Weird Strings is made up of four pages:
- Home
- Synth
- MIDI FX
- Audio FX
Scroll down below for more information on each of these pages.
Home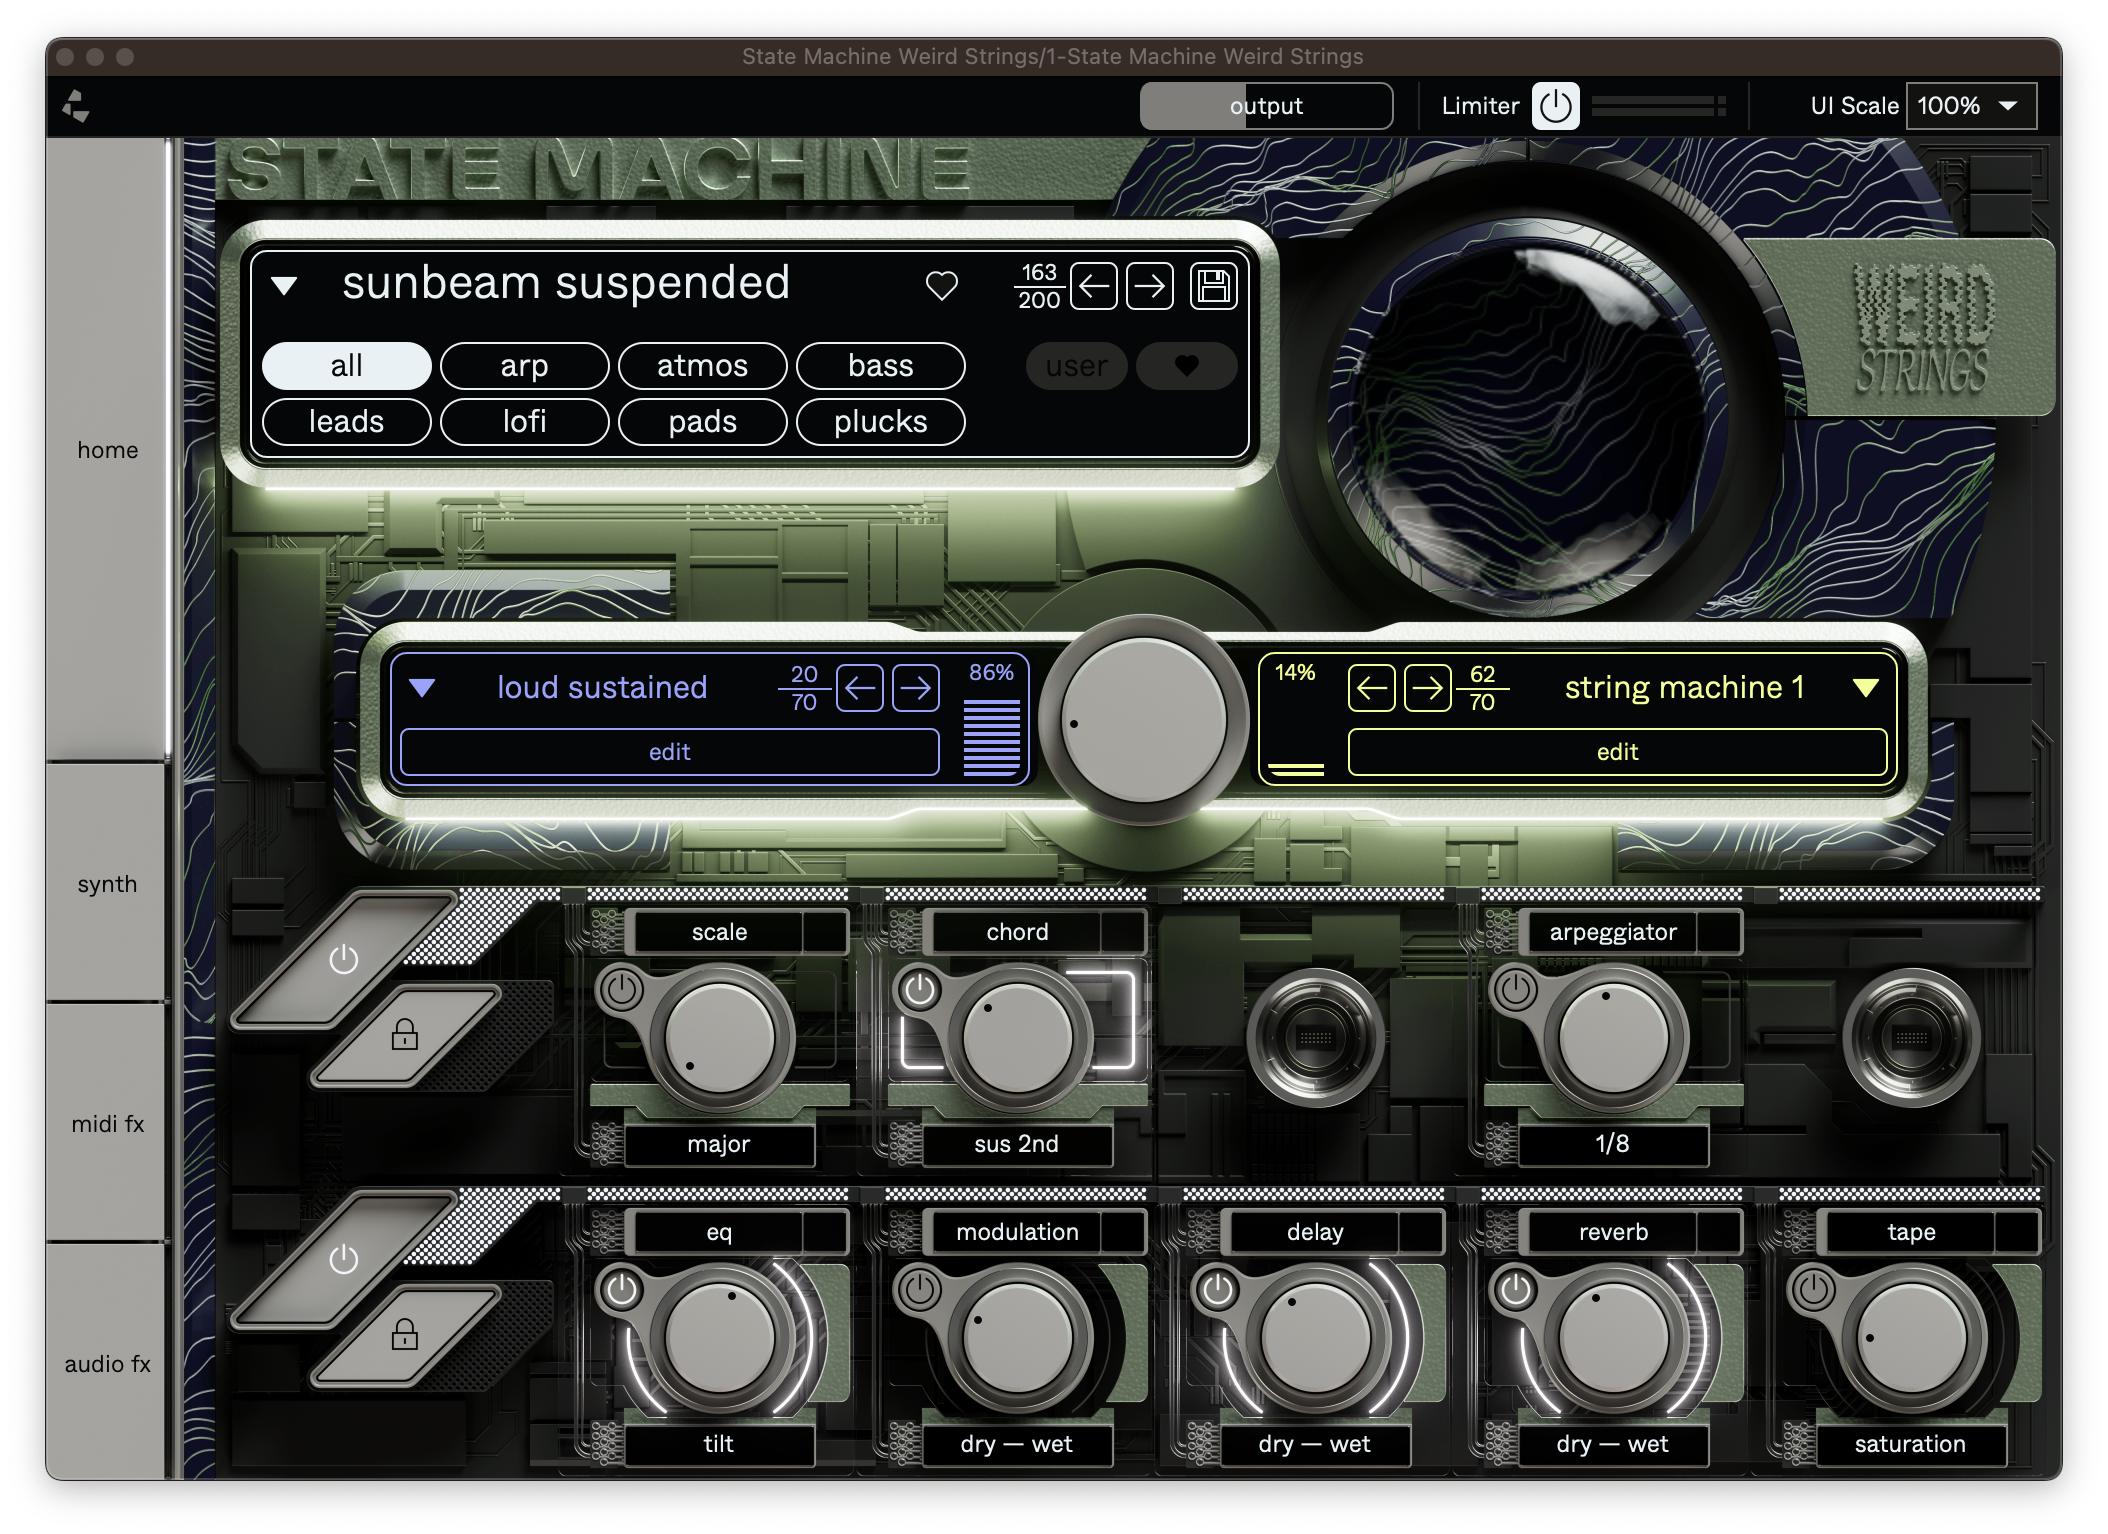
Output
Control the output volume of the selected preset.
Limiter
Apply a limiter at the end of the signal chain with this button to prevent your output signal from clipping. Equally, you can achieve creative textures in the more aggressive & overdriven end of the spectrum by pushing your signal hard with this activated.
UI scale
Resize the plug-in window to suit your screen resolution.
Preset library
The preset library shows the name of the active preset, which is sunbeam suspended in this case. Here you have the option to view 1 of the 7 preset categories, as well as your own user creations and favorite sounds in the 🤍 page.
Click the preset name to open up an expanded browser view of all presets in your selected category.
Sound library
Each preset is composed of two separate layers of sound, which are loud sustained and string machine 1 in the preset pictured above. You can adjust the blend of these two using the dial in the middle, as well as cycle through sounds by using the arrow buttons.
Click the sound name to view all available sounds in a browser view. Clicking on the edit button takes you to the synth page for faster access to more controls for editing the selected sounds.
FX controls
These 2 rows show a handy overview of the 2 sets of available MIDI & audio FX options, allowing you to tweak simple parameters on the fly and quickly engage or disable effects.
More granular controls for the synth layers, midi fx and audio fx are available by selecting the options on the left side, or by simply clicking the module name in the case of the fx parameters.
Synth
Layers - A & B
As well as providing the options presented on the home screen, here you have the option to edit each layer individually using the select button as well as the option tolink & unlink the layers. When linked, any changes made to the leader layer parameter will be applied to both layers, and unlinking allows you to control each layer independently.
The setting per layer for each parameter is color coded: violet for A and yellow for B.
LFO
Tweak these to create different forms of movement to your sound, including to the filter, volume and panning. Choose from triangle, saw, square or randomized waveforms.
Source
These parameters affect the source of your sound, such as the tuning of each layer or adding a smooth pitch glide between notes. You can also choose whether the sound is mono (plays one note at a time) legato (plays one note at a time but allows glide between two notes) or poly (able to play 16 notes simultaneously).
The keyboard parameter determines whether the layer responds to keyboard tracking from incoming MIDI notes or not. When disabled, the layer will only play back at middle C but can still be tuned using the transpose & detune controls. This is particularly useful for percussive/FX sounds and creative arps.
Filter
Use this to cut out or isolate certain frequency ranges using either a low pass, band pass or high pass filter. Alongside the classic A/D/S/R envelope controls, you can change the envelope amount and velocity sensitivity of the filter being applied to the signal.
Amp
This section contains an envelope that controls the behavior of the volume using A/D/S/Rparameters, as well as a panning dial. The velocity parameters control how sensitive the amp is to MIDI velocity input using the off, 50% & 100% options.
MIDI FX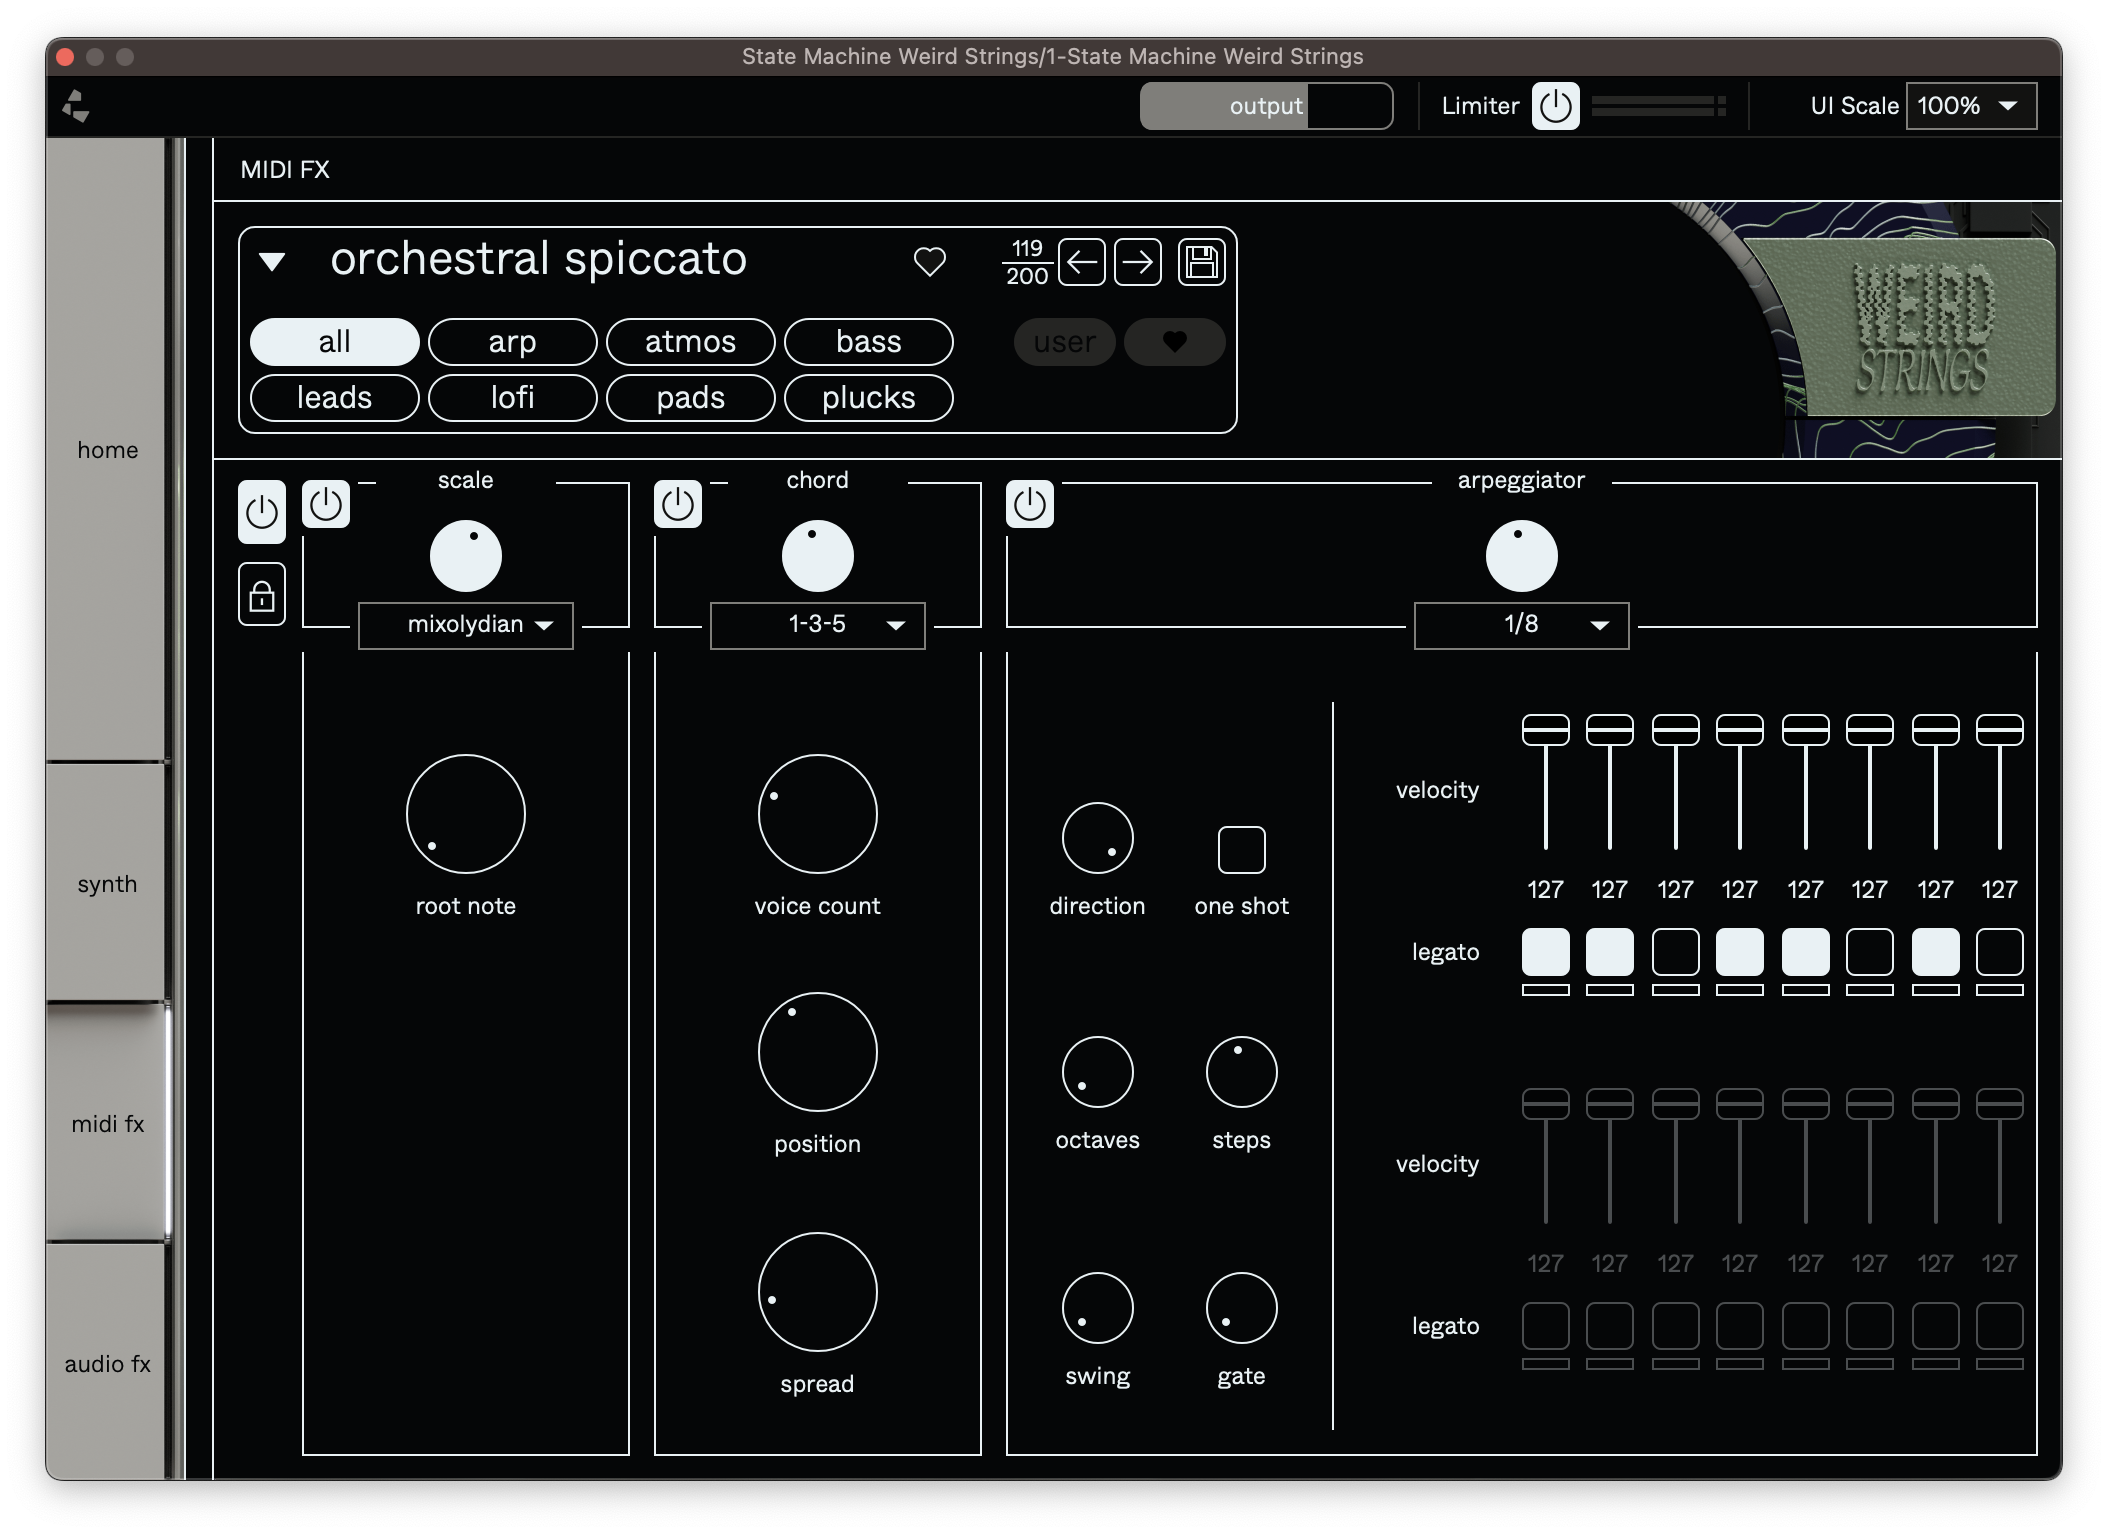
Scale
This determines the musical scale of your MIDI input. Select from the 15 options in the dropdown menu, and adjust where the scale begins using the root note dial.
When activated, any notes that fall outside of the scale are shifted to the nearest semitone within the selected scale - keeping your performance in key at all times.
Chord
The chord function allows you to play multiple MIDI notes from one triggered note, with 13 shapes to choose from. The 3 dials below provide various functions:
-
voice count: select the amount of notes which compose the chord. -
position: adjust the lowest note of the chord voicing. For example, in the1-3-5chord shown above apositionsetting of -1 changes the chord voicing to5-1-3with the 5th played in the octave below. -
spread: spread the chord voicing across a wider range on your keyboard.
Note that the available chord options change depending on whether the scale option is engaged or not.
Arpeggiator
A 16 step arpeggiator, with adjustable velocity and legato options for each step. The top dial determines the rate of the arpeggiator, with the following dials on the left:
-
direction: determines whether the arpeggiator moves up or down an octave, in both directions or entirely at random. Thechordsetting plays back your selected MIDI notes as a chord instead. -
one shot: Triggers the full step sequence once, start to end, independent of how long the incoming note is. -
octaves: the number of octaves included in the arpeggiator sequence. -
steps: select the number of steps in the arpeggiator sequence, from 1 to 16. -
swing: delays the timing of even-numbered steps, giving the pattern a more swung feel as the dial is engaged. -
gate: controls the note length per arpeggiator step.
Audio FX
EQ
Use the bass, middle and treble dials to boost or reduce the presence of elements in those frequency ranges. The tilt dial controls a series of filters, allowing you to shape your sound to make it darker or brighter.
Modulation
Choose to apply either a phaser or chorus effect using the effect switch at the bottom of the panel. You can then control the depth, frequency and stereo width of this effect using the respective dials.
Delay
A digital delay module with a built-in bitcrusher. Control the tempo of the delay effect with time and align it with your project BPM using sync. Increase jitter to get a more digital-sounding distortion overlay.
Feedback allows you to determine the amount of repetitions, while high cut lets you roll the top-end off to get a darker sounding delay.
Reverb
A selection of 6 impulse responses which you can browse using type , with dials for adjusting the pre-delay time and tone of the reverb applied.
Tape
Apply a variety of tape emulation FX to your signal, with the option to select either a modern or vintage approach at the bottom of the panel. Saturation adds harmonic distortion to your sound, modulation applies pitch modulation and wear allows you to degrade the signal with distortion.
Modulation assignments
Following the State Machine framework updates which were released in September 2026, a toolbar & keyboard interface have been added to the bottom edge of the GUI.
Click assign to make changes to the following parameters:
Pitch Bend
Upper and lower values for the pitch bend feature can now be manually assigned within a range of +/- 24 semitones.
Mod Wheel
Clicking each horizontal slot allows you to assign parameters or effects to your MIDI device's mod wheel. You can also manually trigger the mod wheel using the draggable mw module in the bottom left if you don't have a MIDI device connected.
Assignable options include a range of parameters from the synth page per layer (indicated by the abbreviated LA/LB per slot) as well as effect dials from the audio FX page. The numerical dial per slot controls the depth of the effect.
Aftertouch
The same parameters can also be assigned to the Aftertouch control on supported devices. These can also be triggered using the at module in the bottom left.
Keyboard note
Use incoming MIDI notes as a modulation source, effectively controlling any of the available destination parameters by moving up and down the keyboard. A typical use case is to control the filter cut off this way, having the filter open as you move to higher notes and close as you move to lower ones.